Tuesday, February 10, 2015

Rugelach

Chocolate-Pecan Rugelach
(rug·e·lach) (rü-gə-ləḵ)
 Origins of rugelach, the favorite Jewish pastry, date back to the Hungarian kifli, Austrian kipfel and Polish rogal.  The crescent-shaped filled pastry was originally made with yeast dough and filled with fruit jams, poppy seed paste or nuts.  Today rugelach may be the most popular sweet pastry both in the American Jewish community and in Israel.  But these are very different pastries.
            There are many examples in Jewish history of dishes traveling across continents and countries while changing and adapting flavors and techniques; the rugelach, which traveled east and west from Central Europe and ended as very different pastries, carrying the same name.
            In American, bakers quickly came up with a short cut for the complex yeast dough rugelach, and by 1940’s they were already making yeast-less rich cream cheese dough.   

Cream Cheese Dough
6 oz. cream cheese
1-cup (2 sticks) butter, cold
2 cups all-purpose flour
¼ teaspoon salt
1/3-cup sour cream

METHOD OF PREP:
1.             Cut cream cheese into tablespoon-size pieces and let soften at room temperature.  Cut butter into small pieces and keep in refrigerator until ready to use.
2.             Combine flour, salt, and butter into the food processor and process with brief pulses until mixture resembles coarse meal. 
3.             Add cream cheese and sour cream, distributing evenly over the flour mixture.
4.             Process with brief pulses until dough just holds together.  If dough is too dry, add 1 to 2 tablespoons of water. 
5.             Wrap dough in plastic wrap, press it together into a ball and flatten into a disk.
6.             Refrigerate dough 4 hours before rolling, or up to 2 days.

Chocolate-Pecan Filling:
1 cup semisweet or bittersweet chocolate chips (I used Ghirardelli, 60% bittersweet chocolate baking chips)
½ cup pecans, finely chopped
¼ cup butter, melted

METHOD OF PREP:
1.             Prepare dough.
2.             Lightly butter 2 or 3 baking sheets.  Mix chocolate and pecans together in a bowl.
3.             Divide dough into 4 pieces.  Keep remaining dough in refrigerator.
4.             Place ¼ of dough on a lightly floured surface.  Using a rolling pin, roll it into a circle that is about 1/8” thick.  The dough will be very hard, so it is best to first beat it down with a rolling pin.  It will loosen up as it comes to room temperature.
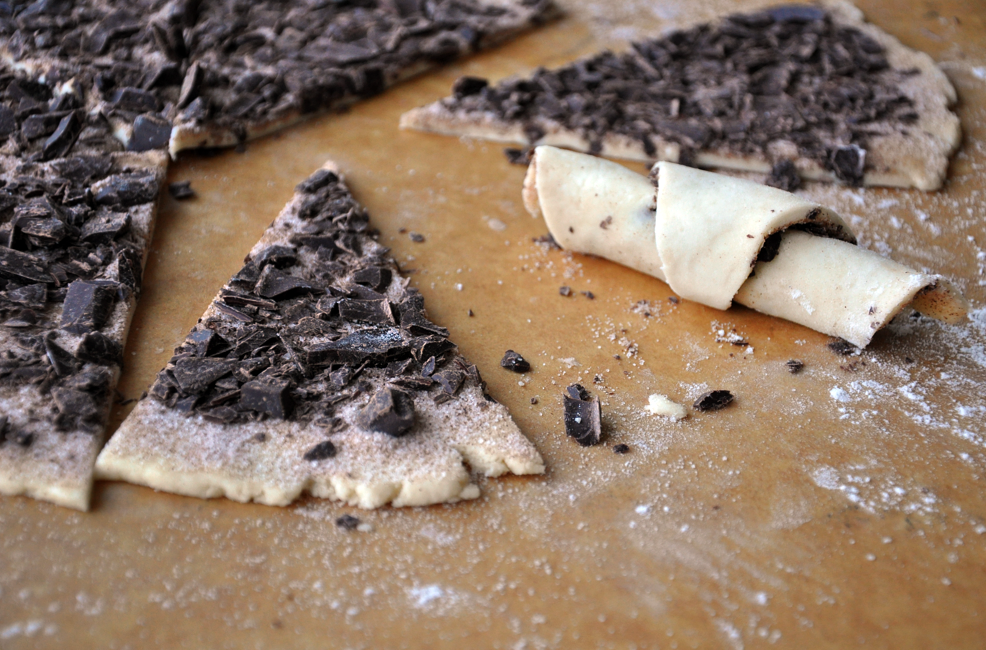
5.             Immediately brush the dough with melted butter and sprinkle it with ¼ of the pecan/chocolate mixture, pressing it lightly into the dough.
6.             Cut the dough into 12 wedges.
7.             Roll each wedge up, starting from the thickest end, until your form a crescent shape.
8.             Repeat the rolling, topping and shaping process with the other three pieces of dough.
9.             Place the Rugelach onto a parchment paper-lined baking sheet.
10.          Refrigerate it for 30 minutes (You can also freeze the Rugelach at this point for later use.)
11.          Bake the Rugelach in a 350-degree oven for 18-20 minutes or until golden brown.
12.          Transfer to a cooling rack and let cool completely.
13.          Enjoy!


RESULT: 
Rugelach is one of my favorite Jewish delicacies.  The filling and dough are both easy to make.  However the cutting and rolling can be problematic.  The original technique I found had the dough cut into squares and double rolling.  The other recipe had the dough rolled into a semi-circle, cut into 12 wedges and roll from the wide end to the skinny end, similar to a croissant.  I prefer the circle into wedges, it created a better final product with equal filling to dough ratio.  

The final product, a mix of chocolate and pecan pieces, it complements the cream cheese dough.  DELICIOUS!

Monday, February 9, 2015

Blintzes

Strawberry-Lemon Cheese Blintzes
One of the best-known and best-loved Ashkenazi foods, blintzes have become specialties in Jewish homes and Jewish delis throughout the United States.  They can have a variety of fillings, from sweet ones like blueberry or apple for dessert, to mushroom or broccoli for appetizers or main courses.  The most famous of all are cheese blintzes, which are served as either entrees or desserts.

Crepe Batter:
1-cup milk
¼ cup water
2 eggs
1-cup all-purpose flour
Pinch salt
1 Tablespoon sugar
3 tablespoons unsalted butter, melted

Cheese Filling:
8 oz. cream cheese
8 oz. ricotta cheese
2 teaspoon lemon zest
1-teaspoon vanilla extract
½ teaspoon salt
¼ cup sugar

Strawberry Sauce:
10 oz. frozen strawberries, (can be fresh depending on season)
*¼ cup water – if using fresh
1-tablespoon sugar
1 lemon, juiced – approximately 2 Tablespoon
½ teaspoon salt

Method of Prep:
1.             Combine the milk, water, eggs, flour, salt and sugar in a blender.
2.             Blend on medium speed for 15 seconds, until the batter is smooth and lump free. 
3.             Scrape down sides of the blender and pour in 3 tablespoons of melted butter.
4.             Blend it again for a second just to incorporate.
5.             Refrigerate batter for 1 hour to let it rest.
6.             Put an 8-inch skillet over medium heat.  Pour ¼ cup of batter into pan and swirl it around so it covers the bottom evenly.
7.             Cook 30 to 45 seconds, or until batter turns brown around the edges.  The crepe should be pliable, not crisp and lightly brown. 
8.             Slide the crepes onto a plate, separating with parchment or wax paper. 

Cheese Filling:
9.             In a food processor or mixer, combine all ingredients together and mix until smooth. 
10.          Cover and refrigerate until ready to use.
11.          (Can be made up to one day ahead.)

Strawberry Sauce:
12.          Place berries in a small saucepot and cook at medium heat.
13.          Add sugar, lemon juice and salt (water added at this point too).
14.          Cook until berries are broken up, softened and thickness is achieved.

Assembly:
Tori Avey demonstrates step-by-step assembly of blintzes on her blog:

15.          Preheat the oven to 375 degrees F. 
16.          Forming blintzes is like making burritos.
17.          Spoon ¼ cup of the cheese filling along the lower third of the crepe.
18.          Fold the bottom edge away from you to just cover the filling.
19.          Then fold the 2 sides in to the center.
20.          Roll the crepe away from you a couple times to make a package, ending with the seam side down.
21.          Place in a greased glass-baking dish.
22.          Bake until warmed through, about 15 minutes. 
23.          Transfer to a serving dish and serve with the strawberry sauce.

*Alternatively, blintzes are often served with a dollop of sour cream and sprinkled with cinnamon sugar


RESULT:
Making crepes is definitely an art.  Reading many recipes, each has a different technique, however I ended up not using a teflon pan, and just spraying each time before I poured the batter.  The result was an evenly cooked crepe.  Some of the blintzes tore as I was assembling, but as the final product, smothered in strawberry sauce or sour cream and cinnamon, it all tastes DELICIOUS!

Monday, February 2, 2015

Matzo Ball Soup

Chicken Matzo Ball Soup
Every food has a history, but not many foods have a history as storied as Matzo Ball Soup.  It’s a tale that precedes even the Bible; one that is told every year in traditional Jewish homes at Passover.  When Moses led the Jews from the oppression of Egypt, the Jewish people had no time to pack food or other provisions.  Instead of the bread they were used to, all the Jewish people had to eat was an unleavened mixture of flour and water that turned flat when left out in the sun to bake.  
In 1888, the Manischewitz Company burst onto the automated matzo production scene – and the rest is history.  To this day, Manischewitz is the most popular brand of matzo in the world.  Previously only available during Passover and made from scratch by your mother or grandmother, now matzo is available in grocery stores year round, and not only eaten by Jews but by anyone with a taste for the crisp, unleavened bread. 
Grinding down matzo to meal and mixing with eggs, water, and a fat such as oil or chicken make matzo balls fat.  When in ball form the bread is traditionally served with chicken broth, and matzo ball soup is just as much a part of Passover as conventional matzo.

Chicken Soup

INGREDIENTS:
8-10# chicken wings
1 # bag baby carrots
5 stalks of celery
4 parsnips, peeled
1 large onion, peeled
1 bunch parsley stems
2 Bay leaves

 METHOD OF PREP:
1.              Slice celery and parsnips into 2” pieces. Place in large stockpot.
2.              Slice onion in half and then each half in thirds.
3.              Place chicken wings in pot.
4.              Add bay leaves and parsley stems.
5.              Fill pot with cold water to cover.
6.              Place on stove on high heat.  Do not cover.
7.              Bring to a boil. Reduce to a simmer.  Cook for approximately two hours, or until chicken is fully cooked.
8.              When chicken is almost done, make matzo ball mixture.
9.              Place a colander into a large bowl.  Turn off heat.
10.          Remove chicken, carrots, parsnips, and celery and place into colander.
11.          Let cool.
12.          Peel chicken meat off bones, place back into pot. 
13.          Slice carrots, parsnips and celery into one-inch pieces.  Place back into pot.
14.          Season with salt and pepper.
15.          Serve and enjoy!

Kosher Perfect Matzo Balls

1 cup matzo meal
4 eggs
1 tsp. salt
4 Tbsp. oil
4 Tbsp. broth

1.              Measure and mix dry ingredients into a bowl. 
2.              Crack eggs into a second bowl.
3.              Add oil & broth to eggs.  Stir gently with a fork until the yolks are broken and the oil is just mixed.
4.              Pour egg mixture into dry mixture and mix gently with fork. 
5.              Do not over mix.  Treat mixture like muffin batter.
6.              Place in the fridge for 1 hour.
7.              Bring a large pot of water to a rolling boil on the stove.
8.              After matzo balls have set, gently remove soupspoon full drops into the water.
9.              When all the balls are in the water, leave it to boil about 40 minutes.
10.          DO NOT STIR.
11.          Drain and place into soup after chicken is picked and veggies are cut.


RESULT:
The best comfort food ever.  I enjoy eating the soup when I'm sick, on a cold winter day, on a snow day and of course during Passover.  This was my first time making it on my own.  I'd say it was a success.  

Other vegetables can be added or substituted.  Other seasonings can be added as well.